3. The First Attempt is a Trial
5. Don’t Rush
6. Don’t Do Too Many Things at Once
7. Revise Protocol of Old Procedures
8. Have All the Necessary Controls
9. Blinding and Double Blinding
10. At Lab Meetings Show Everything
One of the main differences between a successful and unsuccessful research student is that the former plans their work intricately.
It cannot be stressed too clearly: Planning = success.
You don’t want to get half way through a procedure before you realise you don’t know what you’re doing, or worse that don’t have the necessary equipment/permissions to finish it. This wastes your time and resources.
For all procedures, each step should be laid out in a document before starting the experiment, and it is helpful to have a virtual and printed copy.
Get Practical TipsSeparate your work out into all the individual projects you are doing at the same time. If you are only doing one, then break it up into sub-projects.
Plan ahead for each project you are doing, making sure you do not oversubscribe your time with too many large procedures on the same day. Allocate time for planning and analysing and this will prevent you from rushing things, and allow you to book rooms or machines earlier.
Get Practical Tips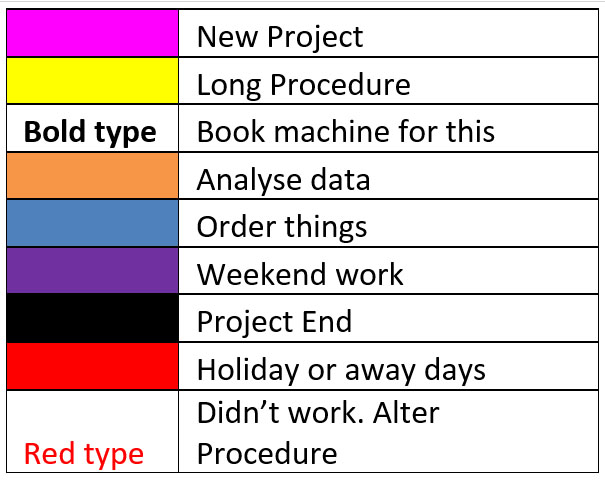
The first time you do something should not be an attempt to collect as much data as possible. Quite the opposite, you should cut the procedure down to its bare bones doing only the minimum to find out if it works. Then you can correct any mistakes before you do the bulk of your work.
Complicating the procedure unnecessarily by collecting extra data will only increase the risk of making a mistake. Always learn the protocol by attempting the procedure before you attempt to maximise the data output. Otherwise, the most likely outcome is stress and failure.
Get Practical Tips
Read Personal Perspective
This advice is especially important if the protocol involves specific incubation times. The more samples you use, the harder it is to keep to those times.
It took me longer to cotton on to this than it should have. In every experiment I did in the early years, my goal was always to obtain the maximum data from it possible.
I watched my supervisor run 50 samples perfectly spaced at the correct intervals, and logic followed that I could do it as well.
WRONG.
After a lot of dead cells, stress and time spent staring at a machine that looked like a 70s black and white TV, I realised I’d forgotten something that made the whole thing pointless.
Instead of wasting one or two samples, I’d depleted my cells to run the maximum amount, and had to wait for them to grow back before I could try again. But even if I had remembered everything, the experiment would still have been a waste because I was so inefficient at the steps that the first samples treated were sitting in the fluorescent dye for much longer than the last ones. Each sample had received significantly different treatment by the time they were ready to analyse.
I wasn’t ready to work with those numbers.
Have you ever failed to follow this guideline? Do you have additional practical tips? Share your experiences or feelings in the comments below, or just give it a thumbs up.
If you are doing a research project that isn’t working, then change one thing at a time.
When you see the complete absence of usable data, it will be very tempting not to follow this advice because the assumption is that something has gone drastically wrong. However, this is not necessarily the case. Very often a single problem is sufficient to throw a procedure way off track. Thus, if you change more than one thing, you may well be correcting the error, but introducing another one.
Get Practical Tips
Get Wet Lab Tips
Read Personal Perpective
Whenever one of my experiments failed, and admittedly this was not an infrequent occurrence, I always felt rushed to do it again and present something useful to my supervisor as quickly as possible.
This was a huge mistake. It wasn’t until I was doing my first year report that I properly researched the problems with the experiment. After this, things went a lot more smoothly, but if I’d just done the research after the first experiment, I could have saved myself a lot of time.
The problem is not always immediately obvious, requiring more than a token alteration. Although it might feel like you’re wasting time, the opposite is true.
Have you ever failed to follow this guideline? Do you have additional practical tips? Share your experiences or feelings in the comments below, or just give it a thumbs up.
The most guaranteed way to screw up an experiment is to rush it… Well, that or a hangover, but the latter is beyond the scope of these guidelines.
If you know your window is too small for the procedure you have in mind, then either enlarge the window or do something else. There are always other things that need doing. The procedure will wait until you have time to do it.
Get Wet Lab Tips
Read Personal Perspective
By the start of the third year of my PhD, the thought of weekend work always filled me with a cold dread. This wasn’t because I preferred to sit at home watching Red Dwarf and eating cheese puffs – though this remains unquestionably true – it was because whenever I worked at weekends I rushed it.
As consistent as my aversion to yellow snow, this resulted in me making obvious and highly avoidable mistakes, which meant I might as well have stayed at home (except for the health benefits of not eating the cheese puffs).
Not labelling things to save time was a key error. Most times I got away with it, but when I didn’t the feeling that I’d basically flushed my weekend down the toilet was not something I’d recommend.
Have you made similar mistakes? Share your experiences or feelings about this guideline in the comments below, or just give it a thumbs up.
If you are doing several procedures at once you will forget things, miss steps, confuse steps, the list is endless. Trying to squeeze in too much will only make everything fail. Concentrate on doing a few things well.
Get Practical Tips
Get Wet Lab Tips
Read Personal Perspective
I can remember weeks when my planner looked like a code book with the page lines cramming multiple sentences on top of each other. I had fallen victim to the fallacy that because I could fit the words describing the tasks in my calendar, it meant I could fit the time it would take to do them into the hours of a day.
When people were using equipment I needed, or it did not immediately work at the required speed, one experiment started to eat into another. Sometimes I was there well into the night, and generally the quality of the work was lower than if I had done them on separate days.
Have you made similar mistakes? Share your experiences or feelings about this guideline in the comments below, or just give it a thumbs up.
When you return after a break to a procedure you knew well, you should treat it like you have never done it before. Otherwise you may miss something.
Our brains are remarkably good at dismissing information we haven’t used for a while, and although you may think you remember everything when you come back, there is a good chance you have forgotten something. Experienced scientists, who are well planned and organised, still fall victim to this problem.
Get Wet Lab Tips
Read Personal Perspective
Once I’d organised myself and stopped trying to cram as much work into each experiment as possible the quality of my data improved. My main problem became that I paid less attention to the protocol because I assumed I knew it.
I rarely missed anything big – I was not such a fool to attempt a protocol I didn’t know pretty well without looking at it. Usually, the timing was a bit off or I didn’t shake mixtures, or I didn’t pre-prepare things that took time to prepare, but small things can still make big differences.
Fortunately, I’ll never know how much extra data I would have got if I’d followed this guideline, but I imagine it isn’t small.
Have you made similar mistakes? Share your experiences or feelings about this guideline in the comments below, or just give it a thumbs up.
When you are unsure of the efficacy of the instrument (be it a person or a machine) you are using to detect a difference between groups, you need both positive and negative controls.
The positive control shows that your procedure is capable of showing an effect, and the negative control shows that your procedure is capable of showing no effect. Whilst it is perfectly normal to mix these up, they do both need to be present.
See Example
Bob has designed a machine for detecting the number of aliens on other planets. He looks at Mars and as expected finds no aliens. Then he looks at two other planets and finds no evidence of alien life there either. Disappointed, he publishes that there are no aliens on either planet. It is only after the invasion that Bob realises the machine wasn’t turned on.
Bob had a negative control which was Mars, where he knew there were no aliens, and when his machine showed no aliens he knew he was not getting false positives. However, Bob had no positive control to show that his machine was actually capable of detecting aliens to rule out false negatives. Your repercussions will probably not be as bad as Bob’s, but if you have any desire for publication, even the lower impact journals will insist on these controls.
Get Practical Tip
Get Wet Lab Tip
Read Personal Perspective
In the last section of my thesis I had a few experiments which I included to flesh it out a bit.
This was a costly and pointless decision simply because in the rush to complete them I had not used the relevant controls. The result was that my viva took an additional (fairly harrowing) hour where both examiners drilled me on what I could possibly conclude from these data. My answer, irrevocably, was that there was nothing. What else could I say?
No controls = no data.
I was forced to delete the entire section from my thesis. What a waste of time that could so easily have been a solid part of my project.
Have you made similar mistakes? Share your experiences or feelings about this guideline in the comments below, or just give it a thumbs up.
It doesn’t take a rocket scientist, or even a scientist, to realise that telling the participant they are taking the placebo removes the point of it.
In a blinded procedure the scientist doesn’t know which group/treatment they are analysing, and therefore cannot introduce personal bias. When working with patients double blinding involves preventing both the patient and the researcher knowing which treatment group the patient is in. This is well worth doing because the effect of placebo on humans can be astonishing.
Work that isn’t blinded is not useless, but it is nowhere near as good. Whether your supervisor tells you to use blinding or not, they will be impressed if you do, as will the people deciding whether your work gets published.
The more subjective the outcome you are examining the more important it is to blind your experiment. Personal bias can be huge.
Get Practical Tips
Read Personal Perspective
I once blinded a study by wrapping bits of foil over the labels of my slides then lettering the foil and saving this letter as the file name when I analysed the data. I then went back to match the letters on the foil to the name of the treatment written on the slide beneath. I picked up the tray and it snapped, sending everything to the floor. Needless to say, my loosely attached bits of foil did not survive the journey unscathed. I was left with a bunch of broken slides, some lettered foil and the haunting certainty that I was going to have to start over.
Have you made similar mistakes? Share your experiences or feelings about this guideline in the comments below, or just give it a thumbs up.